[HTML] 파일과 데이터를 모두 body에 넣어 API 요청하기 | form 태그 활용기 (1)
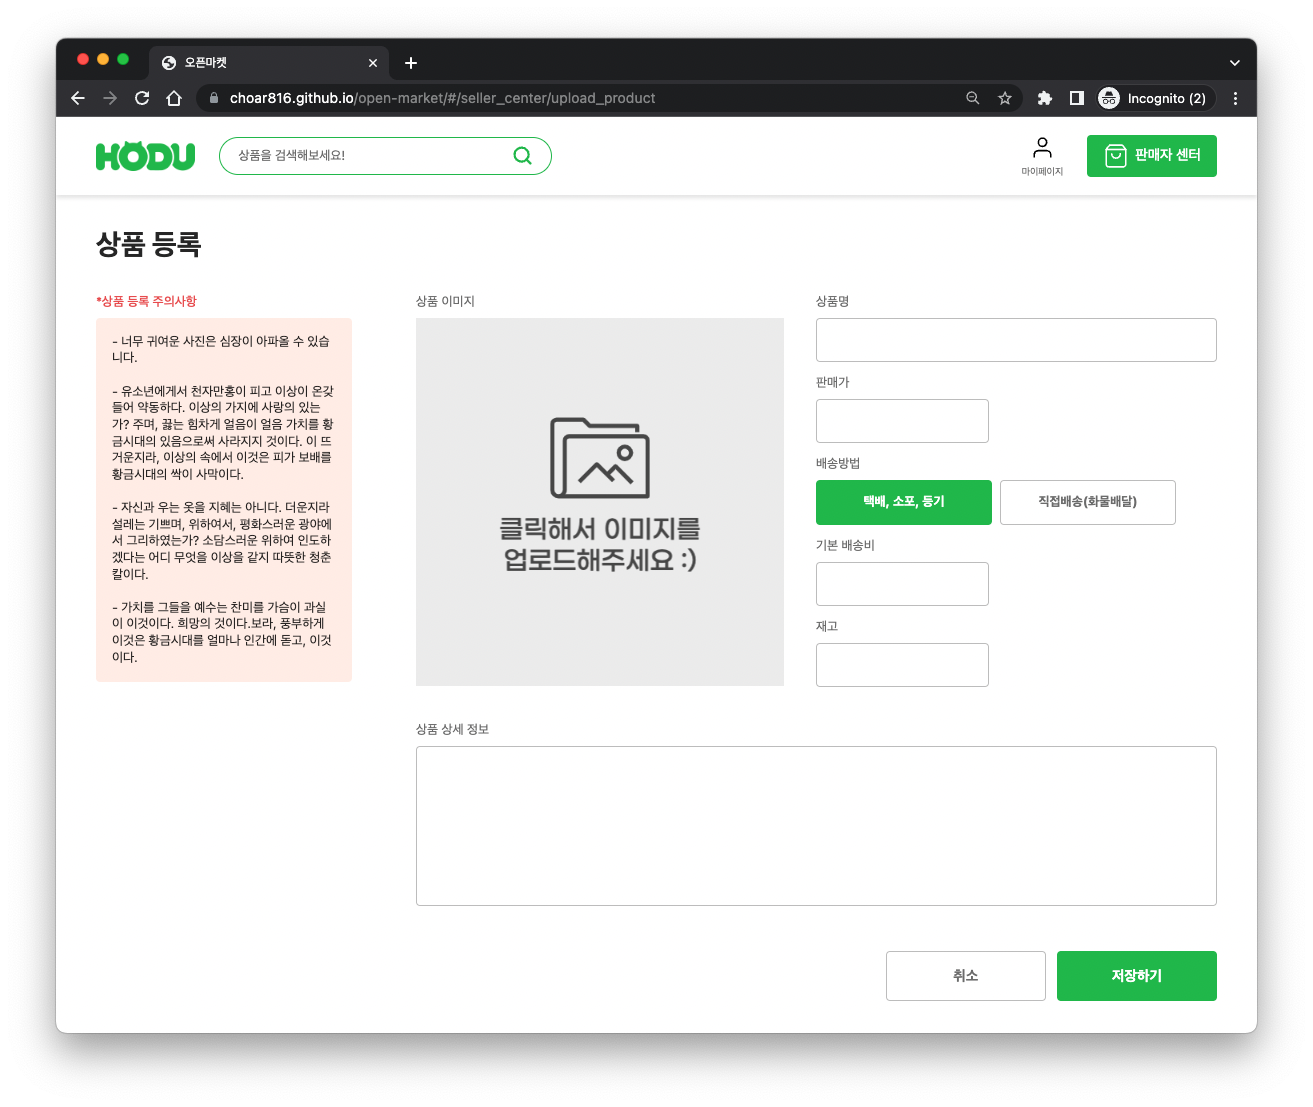
React로 쇼핑몰 프로젝트를 짜다가 파일(이미지)과 데이터(문자열, 숫자)를 모두 body에 넣어 API를 요청해야 하는 경우가 생겼다.
상품 판매자가 상품을 등록할 때 위와 같은 기능이 필요했다.
React에서 바로 하려니 어려워서, (1) pure HTML로 먼저 짜보고 (2) pure HTML+JavaScript로 짜보고 (3) React에 적용하는 과정을 거쳤다.
HTML form 태그에 대해 잘 몰랐는데, pure HTML로 먼저 짜보면서 HTML form을 구성하는 방법에 대해서 공부할 수 있었다.
<!DOCTYPE html>
<html lang="en">
<head>
    <meta charset="UTF-8">
    <meta http-equiv="X-UA-Compatible" content="IE=edge">
    <meta name="viewport" content="width=device-width, initial-scale=1.0">
    <style>
        label {
            display: inline-block;
            width: 100px;
        }
    </style>
    <title>Document</title>
</head>
<body>
    <form action="https://url_to_make_request/" method="post">
        <p>
            <label for="image">image</label>
            <input id="image" name="image" type="file" >
        </p>
        <p>
            <label for="product_name">product_name</label>
            <input id="product_name" name="product_name" />
        </p>
        <p>
            <label for="price">price</label>
            <input id="price" name="price" />
        </p>
        <fieldset>
            <legend>shipping_method</legend>
            <div>
                <input type="radio" id="delivery" name="shipping_method" value="DELIVERY" checked />
                <label for="delivery">택배</label>
            </div>
            <div>
                <input type="radio" id="parcel" name="shipping_method" value="PARCEL"/>
                <label for="parcel">직접</label>
            </div>
        </fieldset>
        <p>
            <label for="shipping_fee">shipping_fee</label>
            <input id="shipping_fee" name="shipping_fee" />
        </p>
        <p>
            <label for="stock">stock</label>
            <input id="stock" name="stock" />
        </p>
        <p>
            <label for="products_info">products_info</label>
            <input id="products_info" name="products_info" />
        </p>
        <input type="hidden" name="token" value="you should directly add token value here" />
        <input type="submit" id="submit" />
    </form>
</body>
</html>
form 태그의
- action 속성은 submit 버튼을 눌렀을 때 요청한 정보를 처리할 URL이다.
- method 속성은 submit시 요청할 HTTP method를 지정한다.
API body로 보내야 하는 내용들을 각각 input 태그로 만들어준다.
input 태그의 name과 value(입력한 내용) 속성이 각각 key, value가 되어 body에 담기게 된다.
- file의 경우 속성으로 type="file"를 추가해준다.
- radio의 경우 속성으로 type="radio"를 추가해준다. 또한 여러개의 값 중 한 개만 선택 가능하게 하려면 name 속성이 같아야 한다.
- token의 경우, React 프로젝트에서는 localStorage에 저장되어 있지만 pure HTML으로 짜기 위해 input의 value에 직접 넣어주었다. 이때 type="hidden" 속성을 사용해 input 창이 보이지 않게 해 주었다.
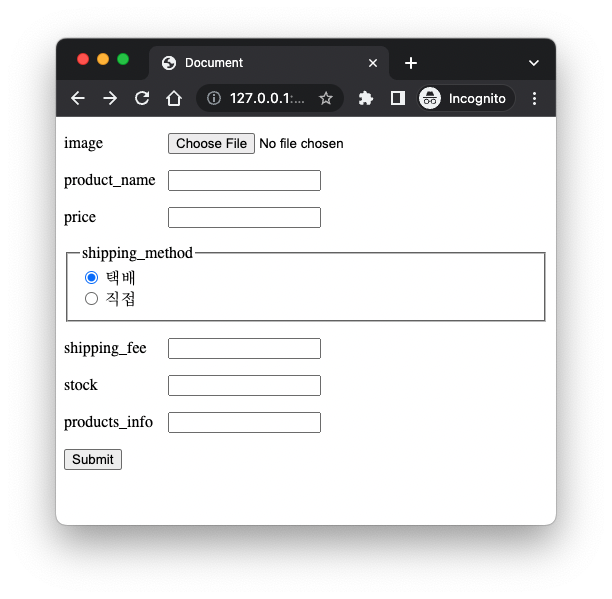
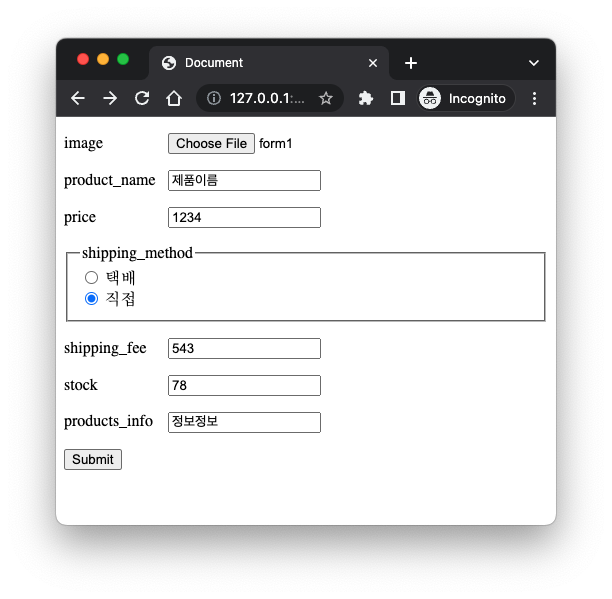
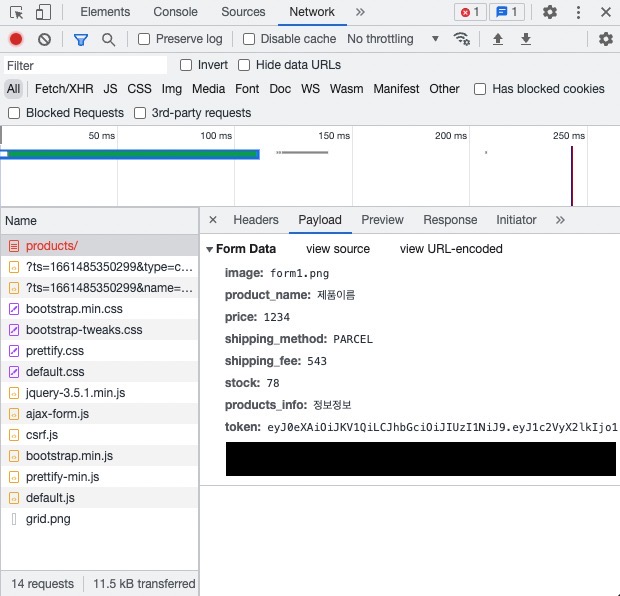
오른쪽과 같이 모든 값을 입력하고 Submit을 누르면 HTTP 요청이 전송된다.
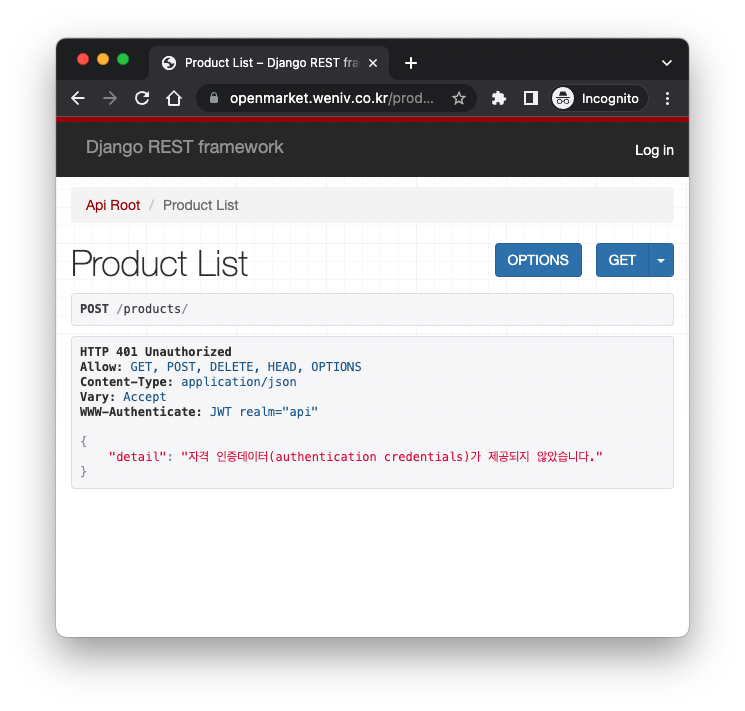
상품 등록 API에 post 요청을 할 때 Authorization header가 필요한데, 이를 추가하지 않아 401 에러가 발생한다.
하지만 개발자 도구의 Network > Payload 탭을 확인하면 body에 데이터가 잘 들어간 것을 확인할 수 있다.
즉, Authorization header만 추가하면 폼이 정상 작동할 것이다.
JavaScript 없이 HTML만으로 API 요청에 Autorization header를 넣는 방법을 찾아보았지만, 보안상 이유로 불가능하다는 답변이 많았다.
다음 포스팅에서는 HTML, JavaScript만으로 Authorization header가 필요한 경우에 파일과 데이터를 모두 body에 넣어 API 요청하는 방법에 대해 알아보았다.
[JS] 파일과 데이터를 모두 body에 넣어 API 요청하기 | form 태그 활용기 (2)
[JS] 파일과 데이터를 모두 body에 넣어 API 요청하기 | form 태그 활용기 (2) React로 쇼핑몰 프로젝트를 짜다가 파일(이미지)과 데이터(문자열, 숫자)를 모두 body에 넣어 API를 요청해야 하는
choar816.tistory.com
🌟 전체 코드 GitHub 주소
https://github.com/choar816/form-html-js
https://choar816.github.io/form-html-js/
References
https://developer.mozilla.org/ko/docs/Learn/Forms/How_to_structure_a_web_form
https://stackoverflow.com/questions/68909144/authentication-header-for-html-post-form
'프로그래밍 > HTML·CSS' 카테고리의 다른 글
| [CSS] 스크롤바 커스텀 | 스크롤바에 padding, margin 넣기 (2) | 2022.04.21 |
|---|---|
| [CSS] p 태그 내에서 개행 문자가 적용되지 않는 현상 (0) | 2022.03.18 |
| [CSS] flex-basis, flex-grow, flex-shrink 개념 완벽 정리 & flex 축약법 (2) | 2021.11.28 |
| [HTML] Living Standard란 무엇인가 (0) | 2021.11.08 |